


Cheat Sheet to Kitchen Cabinet Pulls: Styles & Finishes
How to Choose Kitchen Cabinet Pulls
Start with the fit, then choose the look. If you're replacing kitchen cabinet pulls, measure the distance between the centers of the existing screw holes. Your new pulls need the same spacing unless you plan to drill new holes. Next, pick a style that feels good to grip: bar pulls suit many doors and drawers, cup pulls work well on drawers, and edge pulls keep the cabinet face simple. Choose a finish that works with your cabinet color and nearby fixtures.
A pull's overall length and projection matter too: they affect how it looks and how much room your fingers have. I'm Hayden Ellis, and I'll walk you through those choices so you can find a pull that fits your kitchen and your DIY plans.
Types and Styles of Kitchen Cabinet Pulls
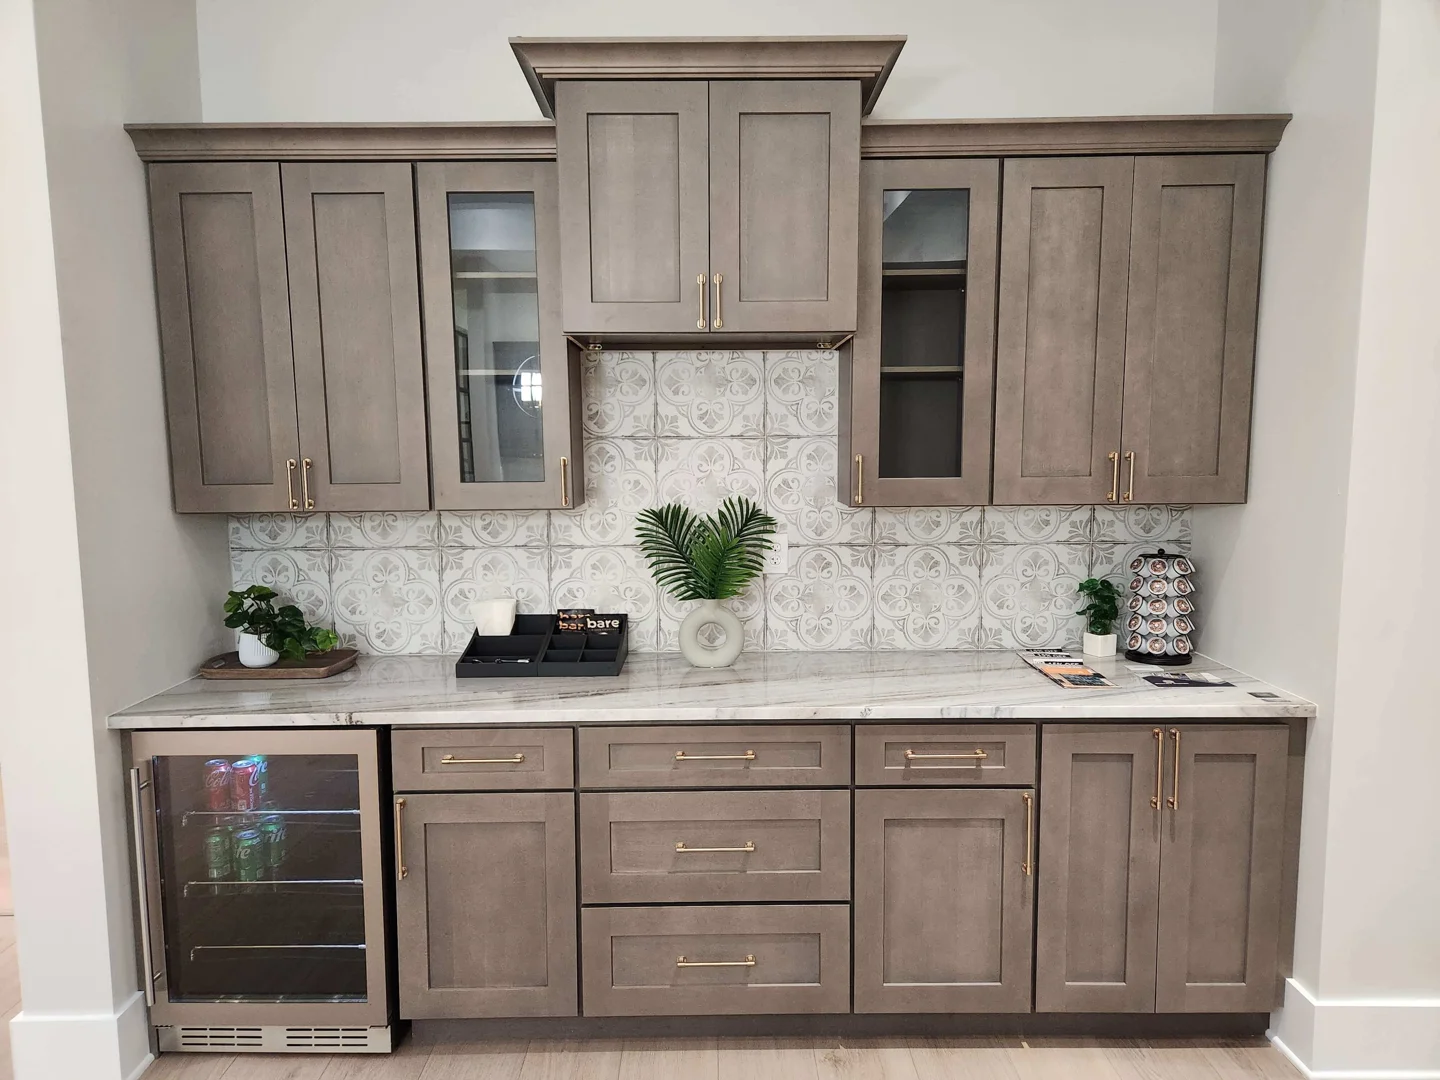
Choosing the right hardware feels a lot like selecting jewelry for an outfit. The right selection elevates the entire space, while the wrong one can feel awkward every time you open a drawer. Decorative hardware comes in a wide variety of handle profiles, each engineered for distinct aesthetics and ergonomic grips.
| Pull Style | Best Aesthetic | Grip Style | Recommended Cabinet Type |
|---|---|---|---|
| Bar Pulls (T-Bar / D-Bar) | Modern, Transitional, Industrial | Full-hand open grasp | Standard doors, deep drawers, pantry units |
| Cup / Bin Pulls | Farmhouse, Traditional, Craftsman | Underhand finger scoop | Base drawers, trash pullouts |
| Edge / Tab Pulls | Minimalist, Contemporary, Scandinavian | Fingertip top/side grasp | Slab doors, modern RTA kitchen cabinets |
| Arch / C-Pulls | Classic, Transitional | Curved four-finger grip | Standard upper and lower cabinets |
| Drop Pulls | Vintage, Furniture-Style | Hanging bail lift | Accent hutches, kitchen islands |
Bar Pulls vs. Cup Pulls and Edge Pulls
Bar pulls remain the most versatile design in contemporary kitchens. Available as classic D-bars (where the handle curves directly into the mounting posts) or sleek European T-bars (where the bar extends past the mounting posts), they offer ample clearance for a full-hand grip. Whether you are outfitting clean lines or textured wood grain, a wide selection of decorative cabinet pulls allows you to customize the functional touch points across all your cabinets.
Cup pulls (often called bin pulls) provide a vintage, utilitarian charm. Because they feature a hooded, semi-circular cup, they require an underhand scoop motion to pull forward. They are traditionally installed exclusively on drawers rather than swinging cabinet doors.
Edge pulls (or tab pulls) mount directly along the top or side edge of a cabinet door, creating an ultra-clean, low-profile look. They let your cabinetry finish take center stage, making them a top contender for minimalist spaces.
Appliance Pulls vs. Standard Kitchen Cabinet Pulls
When panel-ready appliances like integrated refrigerators, freezers, and dishwashers are built into your cabinetry, standard kitchen cabinet pulls won't cut it. Heavy appliance doors create an airtight vacuum seal that requires significant mechanical force to break open.
Appliance pulls are engineered specifically for this load. While standard pulls typically feature a slim 3/8-inch to 1/2-inch diameter, appliance handles boast a beefy 3/4-inch to 1-inch diameter with reinforced mounting posts and thicker screws (often size 10-24 or 1/4-20 bolts). They also scale up in length—often spanning 12, 18, or 24 inches—so you have the leverage necessary to open heavy appliance doors smoothly without stripping mounting threads.
Sizing and Measuring: Center-to-Center Spacing Explained
Before ordering hardware, understanding the basic measurements prevents costly drilling mistakes:
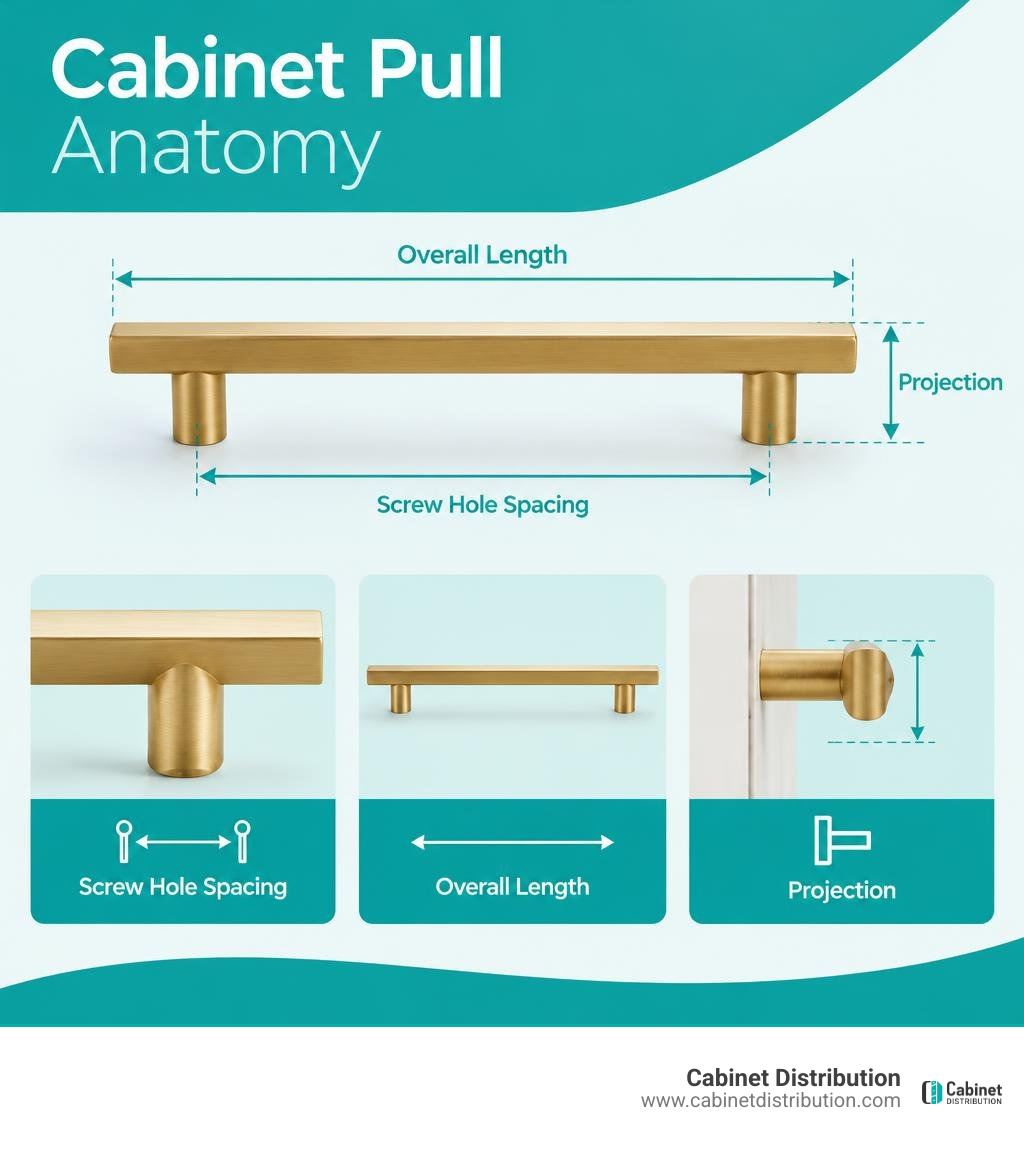
- Center-to-Center (CTC): The exact distance between the center of one screw hole to the center of the other screw hole. This is the single most critical measurement for replacement projects.
- Overall Length: The total distance from one end of the pull to the other. On T-bar pulls, the overall length is always longer than the center-to-center dimension.
- Projection: How far the pull sticks out from the face of the cabinet. Standard projection ranges from 1 inch to 1-1/2 inches, giving average fingers comfortable clearance.
Industry standards use both imperial and metric measurements. Common metric sizes include 96 mm (approx. 3-3/4 in.), 128 mm (approx. 5-1/16 in.), 160 mm (approx. 6-5/16 in.), and 192 mm (approx. 7-9/16 in.). Standard imperial sizes typically land on 3-inch, 4-inch, 5-inch, 6-inch, and 8-inch increments. When preparing your layout, review our guide on how to measure RTA cabinets to keep all your door clearances and drawer fronts perfectly aligned.
How to Measure Kitchen Cabinet Pulls for Doors and Drawers
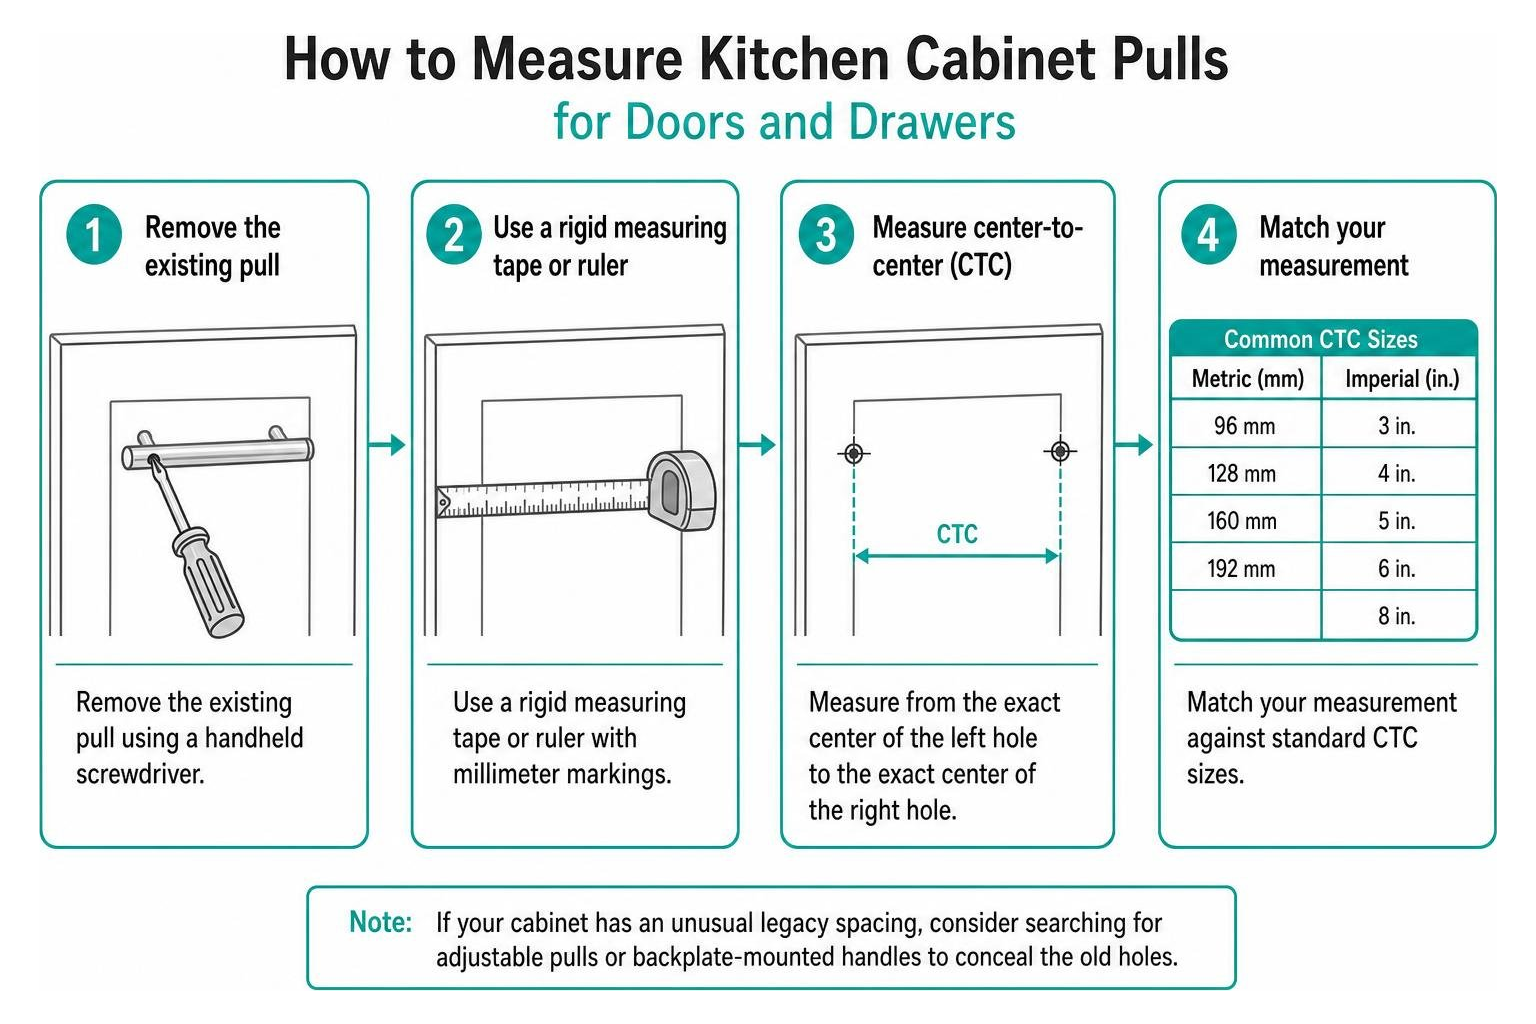
If you are replacing existing pulls and want to avoid patching and repainting screw holes, follow this simple measurement process:
- Remove the existing pull using a handheld screwdriver.
- Use a rigid measuring tape or ruler with millimeter markings.
- Measure from the exact center of the left hole to the exact center of the right hole.
- Match your measurement against standard CTC sizes. If your cabinet has an unusual legacy spacing, consider searching for adjustable pulls or backplate-mounted handles to conceal the old holes.
Sizing Guidelines by Drawer Width and Cabinet Door Height
When choosing hardware for new cabinets without pre-drilled holes, proportional sizing creates visual balance across your kitchen:
- The One-Third Rule: A reliable guideline is to choose a pull with an overall length that spans roughly one-third of the drawer's total width. For example, an 18-inch drawer pairs comfortably with a 6-inch pull.
- Wide Drawers (30 Inches and Wider): You can either install a single oversized pull (8 to 12 inches) centered on the front, or mount two smaller pulls (3 to 5 inches) placed roughly one-sixth of the total drawer width from each outer edge.
- Tall Pantry and Utility Doors: Full-height pantry units demand hardware with substantial presence. Using long pulls (8 to 12 inches or longer) prevents the door from looking top-heavy and provides comfortable leverage. When planning tall units, exploring a smart storage pantry guide helps ensure your storage and hardware work seamlessly together.
Top Finishes and Design Trends for Modern Cabinets
Hardware finishes set the mood of your kitchen, tying together plumbing fixtures, light pendants, and appliance trim.
| Finish | Durability | Maintenance Level | Best Design Pairings |
|---|---|---|---|
| Matte Black | Very High | Low (resists fingerprints) | White Shaker, Natural Oak, Industrial Modern |
| Satin / Brushed Brass | High | Low to Medium | Navy, Forest Green, Ebony, Dark Caramel |
| Satin Nickel | Exceptional | Very Low | Traditional, Transitional, Driftwood Gray |
| Polished Chrome | High | High (shows water spots) | Modern Slab, High-Gloss, Retro |
| Oil-Rubbed Bronze | High | Low | Farmhouse, Rustic, Traditional Glaze |
Popular Finishes: Matte Black, Brushed Brass, and Satin Nickel
Matte black has evolved into a modern classic. Its powder-coated, non-reflective surface resists smudges while delivering crisp architectural contrast. High-quality stainless steel or aluminum cores ensure long-lasting corrosion resistance.
Brushed and satin brass bring welcoming warmth into modern spaces without the glare of vintage polished brass. They develop a gentle glow that pairs effortlessly with rich, warm color palettes.
Satin nickel remains a go-to workhorse finish. Its warm gray, brushed texture hides water spots and scratches, making it ideal for busy family kitchens.
Matching Pulls with Cabinet Colors and Profiles
Creating the right balance between cabinet colors and hardware finishes depends on contrast and undertone:
- Crisp White: Pairing white Shaker cabinets with matte black hardware delivers high-contrast drama. If you want a softer, coastal feel, satin nickel or warm brass provides subtle sophistication, as noted in our look at why white Shaker cabinets are a timeless choice.
- Dramatic Dark Tones: Moody slim Shaker ebony cabinets look striking with brushed brass, champagne bronze, or polished nickel, creating a jewel-box effect against the dark wood. Check out our breakdown of slim Shaker cabinets for styling pointers.
- Rich Warm Stains: Deep finishes like dark caramel cabinets pair naturally with oil-rubbed bronze or matte black to accentuate warm wood grain.
- Textured Neutrals: Weathered tones like driftwood cabinets look best when grounded with matte black or refined satin nickel pulls. For more door-profile inspiration, take a look at our RTA Shaker cabinets guide.
Step-by-Step Installation and Placement Guide
Installing cabinet hardware is an accessible weekend DIY project, but precision is everything. An unaligned pull will catch your eye every time you enter the kitchen. To ensure a smooth installation and avoid common pitfalls, review our breakdown of RTA kitchen cabinets installation tips and mistakes.
Hardware Placement Rules for Upper and Lower Cabinets
While personal preference always plays a role, these standard placement guidelines create natural ergonomic access:
- Upper Wall Cabinets: Center the pull horizontally on the door stile (the vertical frame). Position the bottom mounting hole 2 inches up from the bottom edge of the door, on the side opposite the hinges.
- Lower Base Cabinets: Center the pull horizontally on the door stile. Place the upper mounting hole 2 inches down from the top edge of the door, opposite the hinges.
- Drawer Fronts: On standard base drawers, center the pull both vertically and horizontally. On deep 3-drawer base stacks, some homeowners align all pulls along the upper third of each drawer face to reduce bending over. For more setup details, see our comprehensive guide on how to install RTA cabinets.
Essential Tools and DIY Mounting Tips
To achieve clean, professional-looking mounting holes without splintering your cabinet finish:
- Use an Adjustable Hardware Jig: An inexpensive plastic or aluminum drilling template guarantees that every single hole is drilled at the exact same offset across all doors.
- Back Up the Drill Hole: Hold a scrap block of wood firmly against the back side of the door while drilling. This prevents "blowout" and keeps the exit hole clean.
- Use Breakaway Machine Screws: Standard cabinet doors are 3/4-inch thick, while drawer boxes with separate drawer fronts can measure 1-1/2 inches thick. Segmented breakaway screws allow you to snap off excess length with pliers to fit your exact door thickness.
- Hand-Tighten Final Turns: Avoid using high-torque power drills to drive mounting screws all the way home. Hand-tightening with a manual screwdriver prevents stripped threads and cracked door faces. When maintenance time arrives, keep your finishes spotless by following our advice on how to clean RTA kitchen cabinets.
Frequently Asked Questions about Kitchen Cabinet Pulls
What is the difference between a cabinet pull and a cabinet knob?
A cabinet knob attaches using a single screw at a single mounting point, offering a compact, rotational grasp. A cabinet pull uses two or more screws and features a longer handle bar or cup that allows a multi-finger or full-hand grip. Pulls are generally more ergonomic for heavy drawers and trash pullouts.
Can the same cabinet pulls be used on both doors and drawers?
Yes. Using the same pull design across all doors and drawers creates a cohesive, streamlined look. The standard convention is to mount pulls vertically on swinging cabinet doors and horizontally on slide-out drawers.
What is the standard center-to-center hole spacing for pulls?
The most common standard sizes in modern residential kitchens are 3-inch (76 mm), 3-3/4-inch (96 mm), and 5-1/16-inch (128 mm) center-to-center spacing. Oversized modern designs frequently use 6-5/16-inch (160 mm) and 7-9/16-inch (192 mm) hole spreads.
Conclusion
Upgrading your kitchen cabinet hardware is one of the most rewarding ways to refresh your home. By matching your center-to-center measurements, choosing functional handle profiles, and picking finishes that complement your cabinet tones, you can achieve a polished, custom aesthetic on a practical DIY budget.
If you are planning a full kitchen upgrade or expanding your storage into RTA bathroom cabinets and other spaces—as detailed in our guide on using RTA cabinets beyond the kitchen—we are here to help. At Cabinet Distribution, we provide homeowners and DIY remodelers with high-quality cabinetry backed by 3-day fast shipping, refundable sample doors, and complimentary design services. Ready to bring your dream layout to life? Explore our premium RTA kitchen cabinets and start planning your space today!